Black Skies
Generic Star Fighter Combat Rules
Quick and simple rules intended to create a fast moving star fighter game,
where out thinking your opponent is as important as out shooting him.
Games can be as small as single fighter duels, all the way up to
entire squadrons being used in a multi player campaign setting.
Quite a while back I was looking for something new to play and decided I'd like to try a star fighter combat game. I checked out a variety of rule sets and found nothing that I really liked. In fact, the most popular set seemed to be unnecessarily complex and slow, not something I expected from a set of star fighter rules. What I expected fighter combat to be was FAST. Complex and slow just didn't work. So I set out to create my own (with plenty of help from the guys at my local war gaming club). Using a basic card movement idea, and a simple combat system I tried to make these rules feel more like the fast deadly action I imagine star fighter combat should be.
I recently revisited these rules and I saw several areas for improvement. Along with various small changes I changed the combat system into a Target Number game mechanic so that it matches the piloting mechanic, and now the game doesn't use two different systems for basic game play. I also changed the Tactical Display since the weapon statistics were not very helpful if you had more than one type of weapon. The last major change was in the maneuvers (Forward Thrusters) since I didn't like how they worked originally. If you've been using the old rules and wish to keep using them, you can find them by visiting this LINK.
Pilots
Pilots are given a single attribute, Piloting Skill. This rating determines their chances of successfully flying their fighter through any sudden violent maneuvers made necessary by the combat situation. Failure means briefly losing control of their craft. The higher this numeric rating, the better the pilot.
Marksmanship is something best left to the computer.
Piloting Skill
Level - Description
Fighters
Fighters can vary greatly in construction and armament, and come in 3 sizes or weights - light, medium or heavy. They can include armour and/or shields and may be armed with a number of different weapons. Advanced fighters are equiped with maneuvering thrusters which give pilots a far greater range of flying options.
Weight
Thrusters
All fighters come equiped with basic thrusters to enable the craft to move, but some may have additional maneuvering thrusters to allow the fighter to perform extra maneuvers otherwise not permitted. Maneuvering thrusters may be located in one of three locations -
Weapons
All weapons have the following attributes -
The weapons a fighter is armed with are listed on its Tactical Display (and are described in the Combat section)
Armour
A fighter's armour decreases the amount of damage done by an opponent's hits
Shields
Shields weaken the damage potential of an opponent's weapons
Formations
With few exceptions, fighters are formed into Elements of two fighters each, a lead fighter and his wingman.
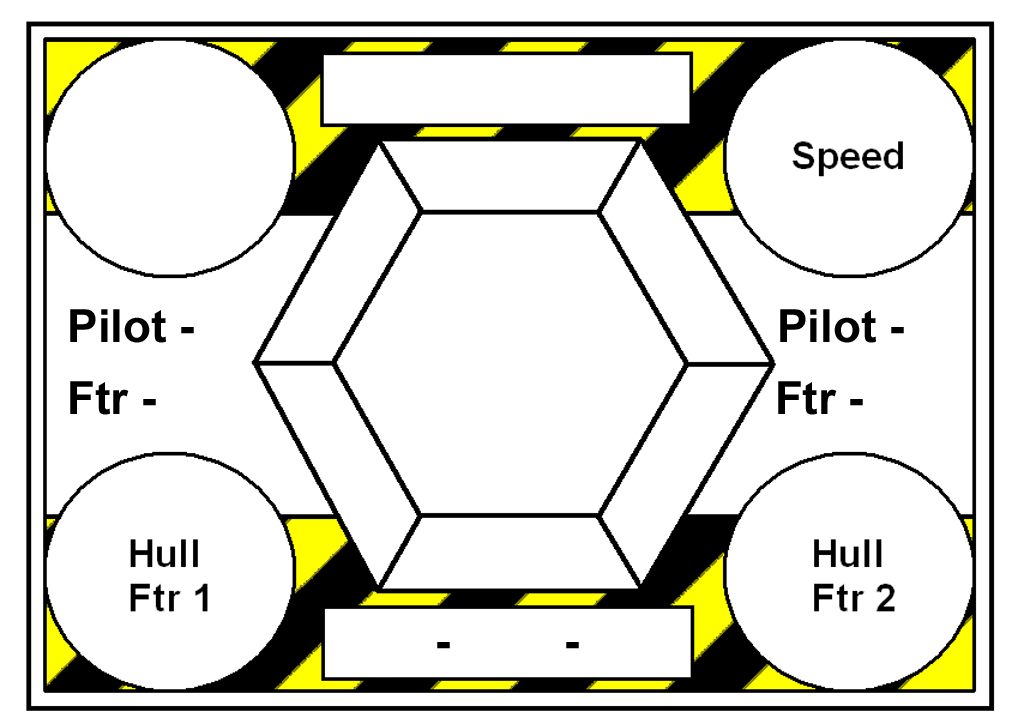
Tactical Displays
Click on the picture for a large blank version.
Pilot 1's piloting skill is marked on the left, Pilot 2's on the right. Both pilots always fly the same type of fighter. The craft's Arc of Fire is shaded grey. It's weapons (2 Laser Cannons) are marked under the large hex. Any miscellaneous data is marked in the upper left circle.
Place a d12 in the upper right circle marked 'Speed' to keep track of both fighter's current speed (remember - elements stay together).
Fighter 1's current Hull Integrity (the amount of damage it can take) is marked in the circle lower left, Fighter 2's is in the lower right.
Use a d4 for light, d6 for medium and d8 for heavy fighters. Subtract from these dice as the fighters take damage.
Movement is done by players alternatively moving elements until all fighters have moved (and fired) once, then continuing with this movement sequence for the remainder of the game. Fighters of the same element must at all times remain within six inches of each other. All fighters are capable of performing the 3 basic maneuvers - Straight, Turn Left, or Turn Right. Fighters configured with Forward, Side or Rear thrusters are also capable of performing additional maneuvers depending on which thrusters they have. All maneuvers have a difficulty rating, and sometimes a speed penalty for attempting them. Maneuver Cards (or counters) are used to identify which maneuver you intend to use in the coming turn.
We impose a maximum speed limit of 12 on all fighters so that the trade-off of complex maneuver vs speed loss becomes a resource management decision.
Maneuver Cards
A deck of ordinary playing cards (or special made counters) is required to mark the maneuvers chosen by the players each turn. Each element of two fighters uses its own suit, so if more than four elements (eight fighters) are being used in the game, additional decks are needed. Each type of maneuver is given its own card number (see below) with Basic Maneuvers being numbered 1 - 3 and the Additional Maneuvers numbered 4 - 12.
Before the game starts chose what suit belongs to which fighter element, and select from the deck all cards (of that suit) that those fighters are capable of. These will be your Maneuver Cards for that element. For example, if a player had only one element of basic fighters, he might chose Spades as its suit, and since they were only basic fighters, he would pick the 1 (ace) 2 and 3 of spades to represent the Basic Maneuvers. During the game he would be limited to those three maneuvers. If his fighters had Side Thrusters as well, he would also pick the 7, 8 and 9 of spades, giving him twice the movement options. For maneuvers 11 and 12, use the Jack and Queen cards. The King may be used as a place holder card if the sides are uneven, or if both fighters in an element have been destroyed.
Setup
First, decide on which fighters you intend to use in the game, divide them into elements and set up Tactical Displays for them.
Second, deploy your fighter elements along your table edge. Use some method of randomly choosing who begins deploying first, then you and your opponent alternately deploy your fighter elements.
Finally, choose the starting speed for each of your fighter elements and mark it with the d12 on their Tactical Displays. Choose each element's first maneuver from the cards available to them and place each card face down on the table next to the fighter models. Decide the order you want your elements to move and stack these cards so that the card for the first one to move is on the top, then the next, etc. This will be your Movement Deck, and will determine not just which maneuvers the fighters will be taking, but the order in which they move as well.
Moving
Randomly determine who moves first. The first player flips over the top card in his Movement Deck, decides which option to use (if more than one is permitted), takes any Piloting Checks required (see below), and moves that element's fighters accordingly. If these fighters have any targets in range and in arc after moving, the player may fire them. Lastly, after quickly checking the table and attempting to anticipate his opponent's moves, he chooses next turn's manuever for this element and places that card on the bottom of his Movement Deck.
If one player has less elements than his opponent, he needs to put Placeholder cards in his deck. All player's Movement Decks must contain the same number of cards, otherwise one player's fighters will end up moving more often than then rest. For example, if player 1 has four elements and player 2 has only three, then player 2 needs a placeholder card. During the game, you might need to add Placeholder cards whenever a player loses an entire element. When a Placeholder card comes up, the player passes his turn.
Piloting Check
A piloting check must be taken for each maneuver attempted. A six sided die (d6) is rolled and the pilot's Piloting Skill Level is added to the score. This total must be equal to or greater than the maneuver's Difficulty Rating for the maneuver to succeed. Most maneuvers do not require an actual roll since their difficulty is low enough that most pilots pass automatically.
Failing a Piloting Check means that fighter control has gotten away from the pilot. The chosen maneuver is ignored and the easiest of the basic maneuvers in the same direction is substituted instead. For example, a pilot attempting and failing an Sideslip Left performs a basic Smooth Left instead. His wingman REMAINS WITH HIM. A fighter out of control this way may not fire this turn, although the wingman may also take this test to see if he may fire.
There are two situations that may modifiy this test. A pilot in a crippled fighter (one that has taken half damage - see combat) has the difficulty rating of all maneuvers doubled. Also, if a pilot fails a Piloting Check, then any further tests he is required to take on the same turn also have their difficulty ratings doubled. This is a rare occurance, but if a pilot fails his pilot check, then needs to dodge an asteroid, the results may be unfortunate.
All maneuvers have a Difficulty Rating (used during Piloting Checks) and a Movement Penalty. The Movement Penalty is subtracted from the fighters current speed at the end of movement, and is applied whether the maneuver succeeds or not. For example, a fighter moving 8 inches per turn attempts a Hard Left. Its current speed for this turn remains 8 until its movement is finished and then it drops to 6 inches per turn. Mark this new speed on the d12 on the fighter element's Tactical Display.
Basic Maneuvers
1. Straight - a fighter performing a Straight maneuver may take any one of the following 3 actions
2. Left - a fighter performing a Left turn maneuver may take any one of the following 3 actions
3. Right - a fighter performing a Right turn maneuver may take any one of the following 3 actions
Additional Maneuvers
Rear Thrusters
4. Afterburner - difficulty 2 - penalty 0 - a fighter performing the Afterburner maneuver will
5. Hard Left - difficulty 3 - penalty 2 - a fighter performing the Hard Left maneuver will
6. Hard Right - difficulty 3 - penalty 2 - a fighter performing the Hard Right maneuver will
Side Thrusters
7. Snake - difficulty 3 - penalty 0 - a fighter performing the Snake maneuver may take any one of the following 2 actions
8. Sideslip Left - difficulty 2 - penalty 0 - a fighter performing the Sideslip Left maneuver will
9. Sideslip Right - difficulty 2 - penalty 0 - a fighter performing the Sideslip Right maneuver will
Forward Thrusters
10. Bootlegger - difficulty 2 - penalty 2 - a fighter performing the Bootlegger maneuver will
11. Reverse Left - difficulty 3 - penalty 4 - a fighter performing the Reverse Left maneuver will
12. Reverse Right - difficulty 3 - penalty 4 - a fighter performing the Reverse Right maneuver will
Retrograde Motion. . .
After moving an element, if the fighters have targets in arc and in range of their weapons, the controlling player may then choose to fire them. Roll the number of d12s determined by the number of weapons and each weapon's ROF. Each roll equal to or greater than the Target Number for the range (after applying modifiers) represents a hit. Roll damage for each hit, modify for shields and armour, and subtract from the target's fighter weight die. When this die reaches zero, the target fighter is destroyed
Target Numbers (by range) - Close range: 4 / Medium range: 7 / Long range: 10
Modifiers - target speed 0: +4 / target speed <4: +2 / target speed >9: -2 / - maneuver penalty
A fighter becomes 'Cripled' when its Fighter Weight die drops to half or less. A cripled fighter is harder to maneuver, and may only fire half (round down) of its weapons during firing. When a fighter's Hull Integrity drops to 0, it is destroyed.
Weapons
Arc of Fire - the 60° arc(s) that the weapon can fire into
Rate of Fire - the number of times the weapon fires per turn, giving the number of d12s rolled per shot
Range - Close / Medium / Long ranges are shown
Damage - the die type used to roll for damage
Armour
A fighter can have three levels of armour; none (0), light (-1) and heavy (-2). A light fighter may not have heavy armour. The level of Armour on a fighter subtracts from the damage done by each hit. For example, if a fighter with light armour (-1) was hit twice and the damage rolled was 2 and 3, then the actual damage applied would be (2-1) + (3-1) or 3. Each level of armour costs the fighter one hardpoint.
Shields
Shields decrease the damage die type of your opponent's weapons by one. For example, if a fighter with shields was hit by a Laser Cannon (damage = d6) the die your opponent actually rolled would be a d4 instead. Each level of shielding costs the fighter one hardpoint.
rules to come
Laser Cannon
Arc of Fire - forward arc only
Rate of Fire - 1
Range - 6 / 12 / 18 inches
Damage - d6
Black Tiger
Weight - Medium
Thrusters - Rear
Weapons - Laser Cannons (2)
Armour - Light (-1)
Shields - No
 |
 |
 |