![]()
Rules of Play
Read This First:
The rules to this game are organized into a set of numbered Sections. Each Section begins with a General Rule (and sometimes a Procedure) followed by a series of specific Cases - decimally numbered paragraphs headed by a boldface sentence containing the main thought of that specific rule.
[1.0] How to Start
GENERAL RULE:
G63 (Gettysburg 1863) consists of
PROCEDURE:
The components should be spread out on a table with two Players sitting on either side. The die-cut counters should be printed in color, mounted on cardboard, and carefully cut apart and segregated as to national group. The map itself should be printed out on white card-stock paper and carefully laminated.
The Players should skim through the rules by reading only the bold sentence-headlines in the various rules sections. Then the pieces should be placed in their starting positions (as indicated by the four-digit numbers in the Historic Deployment Chart). At this point, the Players should review the Sequence of Play and begin a trial game, referring to the details of the rules when they have a question.
Note that it is possible to play an enjoyable solitaire game against oneself simply by assuming the role of either Player in proper sequence.
COMMENT:
G63 (Gettysburg 1863) is a simulation at the army level of the battle of Gettysburg, between the Federal forces of the North and the breakaway states of the South in rebellion during the early days of July in 1863.
[2.0] Equipment
GENERAL RULE:
The game equipment consists of the rules, charts, map, and playing pieces.
CASES:
[2. 1] The game map represents the terrain on which the battle was fought.
A hexagonal grid is superimposed on the terrain of the map to regulate movement and positioning of the playing pieces.
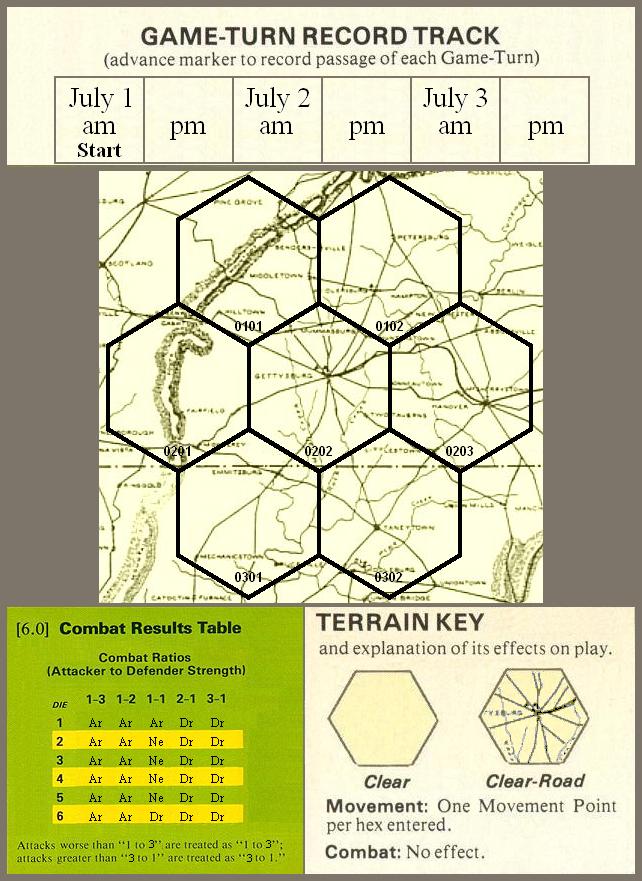
Players will note that each hexagon (hereafter called "hex") on the map has its own four digit identity number.Click here to retrieve the complete playing board.
[2.2] The Terrain Key summarizes movement and combat effects.
[2.3] The Combat Results Table is the primary means for resolving combat.
Players will need one die from a set of common six-sided dice in order to play the game.
[2.4] The playing pieces represent the actual military units that took part in the historical battle.
There are four items of information on the front face of each unit. The Player is shown what Nationality the unit belongs to (Union or Confederate) by which flag is presented. The Player is given the Combat Strength and the Movement Allowance of each unit. Additionally, the Player is also told the name of the unit's historic commander.
Click here to retrieve the playing pieces for both armies.
[2.5] Combat Strength is the basic power of a unit when attacking or defending.
The Combat Strength value of a unit is deemed to consist of the printed number of Combat Strength Points. The Terrain Effects Chart (Terrain Key) will detail how this number is affected by combat.
[2.6] Movement Allowance is the unit's basic ability to move in one Movement Phase.
This ability is expressed in terms of Movement Points. Each hex entered costs a unit one Movement Point.
[3.0] Basic Procedure
Historic Deployment Chart:
Confederate Army Command Unit "Lee" - Hex # 0101
Union Army Command Unit "Meade" - Hex # 0302
The Sequence of Play
The Players take turns moving their units and making attacks. The order in which they take these actions is described in this sequence of play outline. One completion of the sequence of play is called a Game-Turn. Each Game-Turn consists of two Player-Turns, an AM turn where the Union player moves his forces and conducts attacks, and a PM turn where the Confederate player then moves his forces and conducts attacks. Each Player-Turn consists of two Phases.
THE UNION PLAYER OR 'AM' TURN:
Step 1. Union Movement Phase - The Union Player may move his unit.
Step 2. Union Combat Phase - The Union Player may attack any Confederate unit in the hex occupied by the Union unit.
THE CONFEDERATE PLAYER or 'PM' TURN:
Step 3. Confederate Movement Phase - The Confederate Player may move his unit.
Step 4. Confederate Combat Phase - The Confederate Player may attack any Union unit in the hex occupied by the Confederate unit.
Each cycle through these four steps is treated as the passing of one day. These four steps are repeated three times representing a maximum battle length of three days. The game is then over and the Players determine the victor according to the rules on How the Game is Won. Note that the game may be ended earlier if one Player achieves his victory conditions.
Compulsory Movement
During the July 1st AM turn the Union player must move the "Meade" counter to Hex #0202 (Gettysburg) to represent Buford's independent decision to advance his cavalry division and delay the Confederate army, thereby drawing in the 1st and 11th Corps.
During the July 1st PM turn the Confederate player must move the "Lee" counter to Hex #0202 (Gettysburg) to represent the unauthorised attack of Heth's division on the Union positions on Seminary Ridge thereby drawing in the rest of Hill's and Ewell's Corps.
[4.0] Movement of Units
GENERAL RULE:
Each unit has a Movement Allowance number printed on it which represents the basic number of hexes it may move in a single Movement Phase. Each Player moves only his own unit during the Movement Phase of his Player-Turn (as outlined in the Sequence of Play).
PROCEDURE:
A unit moves hex-by-hex, in any direction that the Player desires. The Movement Phase ends when the Player announces that he has moved his unit (or as of the time that he begins to make attacks).
CASES:
[4. 1] A unit may never exceed its Movement Allowance.
During its Movement Phase, each unit may move as far as its Movement Allowance permits. Basically, each unit spends one Movement Point of its total Allowance for each hex that it enters. Individual units may move less than their Movement Allowance. Units are never forced to move during their Movement Phase. Units may not, however, accumulate unused Movement Points.
[4.2] Units must spend one Movement Point to enter each hex.
[4.3] A unit must stop upon entering a hex that contains an Enemy unit.
Whenever a unit enters a hex that contains the Enemy Player's unit, the moving unit must immediately stop and move no further that Phase. The hex containing an Enemy unit is called the Zone of Control of that unit.
A unit may not move so long as it is in an Enemy occupied hex. Only by freeing itself through a combat result may a unit escape the 'freezing' effect of an Enemy Zone of Control.
[4.4] Except for the Victory Conditions, units may not leave the map.
If forced to do so by the Combat Results Table, they are eliminated instead. [See Case 7.1]
[5.0] Combat Preconditions
Eligibility Requirements for Attacking Units.
GENERAL RULE:
Each unit has a Combat Strength number printed on it which represents its basic power to attack during its Combat Phase and to defend during the Enemy Combat Phase. No unit is forced to attack during its Combat Phase, it may pass instead.
PROCEDURE:
The Player examines the position of his unit, determining if it is in the Enemy's Zone of Control. Attacks are conducted using the Combat Results Table, the die, and the procedures detailed in the section on Combat Resolution [See Case 6.0]
CASES:
[5.1] A unit that is in an Enemy Zone of Control may attack, or it may pass.
[5.2] No unit may be involved in more than one attack per Combat Phase.
No unit may participate in more than one attack, nor may a given Enemy unit be the object of more than one attack, in a single Combat Phase.
[6.0] Combat Resolution
How Attacks are Evaluated and Resolved
GENERAL RULE:
An 'attack' is defined as the comparison of the strength of a specific attacking unit with that of a specific defending unit and resolved by the throw of a die in connection with the Combat Results Table. The results may affect either the attacker or the defender.
PROCEDURE:
The attacking Player uses the Combat Strength of his unit and compares it to the Combat Strength of the Enemy unit attacked. The resulting comparison is called the Combat Ratio. The Player locates the column heading on the Combat Results Table that corresponds to the Combat Ratio. He rolls the die and cross indexes the die number with the Combat Ratio column and reads the result. The indicated result is applied immediately. When he has made his attack, the Player announces the end of his Combat Phase.
CASES:
[6.1] The attacking Player must announce when his unit is involved in an attack against a defending unit.
He must calculate and announce the Combat Ratio, before it is resolved. Once the die is thrown, he may not change his mind.
[6.2] The calculated Combat Ratio is always determined to represent a specific column of results on the Combat Results Table.
If the Combat Ratio in an attack is higher (or lower) than the highest (or lowest) shown on the table, it is simply treated as the highest (or lowest) column available. Ratios are always rounded off in favor of the defender.
[6.3] The abbreviations on the Combat Results Table will indicate which (if any) units must retreat.
Ar = Attacker retreats; the attacking unit is forced to move two hexes directly away from the defender.
Ne = No effect; neither the attacking or defending unit is effected by this result.
Dr = Defender retreats; the defending unit is forced to move two hexes directly away from the attacking unit.
[6.4] Units must be retreated (by their owners) directly away from the enemy.
This movement must be in a straight line, directly away from the enemy unit combat was just concluded with. If the attacking unit is retreating, this must be back in the direction it originally came from. If the defending unit is retreating, it must be directly away from the direction the attacking unit approached from.
[7.0] How the Game Is Won
Demoralization and the Conditions of Victory
GENERAL RULE:
It is the object of both Players to drive the Enemy Army from the area represented by the map.
PROCEDURE:
When one Player's Unit is forced to retreat off the board due to combat results, the other Player is judged the winner.
CASES:
[7.1] One Player forces the other Player's Unit to retreat off the board.
If this happens, the game stops immediately and the Player with his Unit still on the board is declared the winner.
[7.2] The game is a Draw if neither Player fulfills this victory condition.
If neither Player forces his Opponent's unit off the board by the completion of the July 3 pm turn, then the game is determined to be a draw.
[8.0] Historical Notes
A day by day recreation of the actual events which occured during the Battle of Gettysburg.
July 1st
AM - As a result of Buford's decision to block the Confederate advance, Meade with the Union army moves into Hex #0202.
PM - Lee moves into Hex #0202 and finds himself drawn into the battle for Gettysburg. He rolls a "5" and just misses driving off the Union army.
July 2nd
AM - Meade likes the defensive potential of his position and decides to pass.
PM - Lee sends Longstreet against the Union left flank, but only rolls a "4" - not as good a result as on the previous day.
July 3rd
AM - Meade, still reluctent to attack, once again passes.
PM - Lee, always aggressive, sends Picket and others against the Union center, rolls a "1" and loses the battle.
G63 (Gettysburg 1863)
Design Credits
Game Design:
Dan AbbottGraphics and Rules:
Dan AbbottEditorial and Graphic Production:
Dan AbbottJoke By:
Dan Abbott